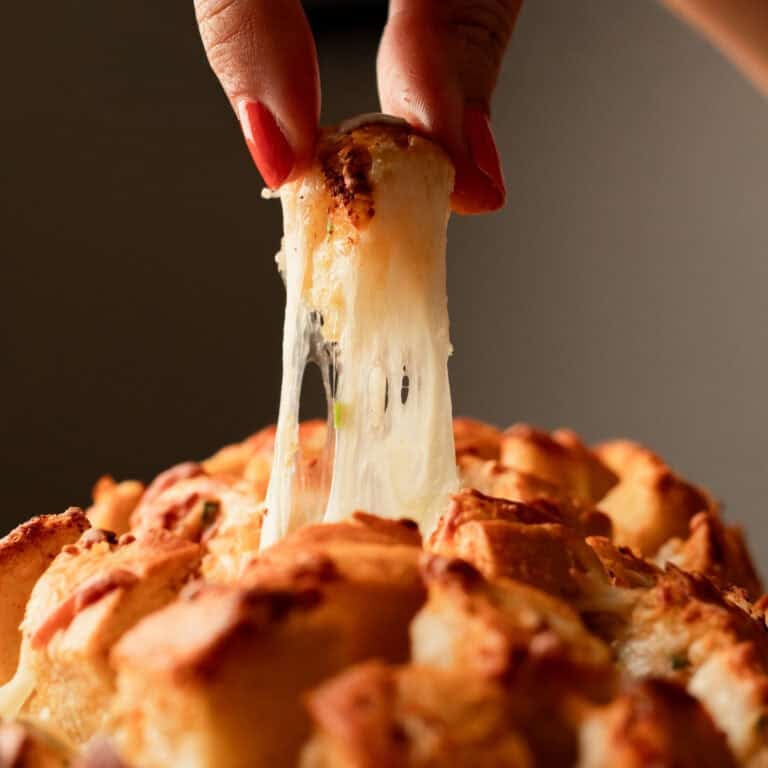
This deliciously gooey and unique mac and cheese will make you wonder why you had it any other way! This Kimchi Mac and Cheese is loaded with drool-worthy melty cheese, an irresistibly crunchy topping, and of course bursts of refreshing kimchi that beautifully cut through the richness of cheese for a beautiful balance. There’s no going back after this Kimchi Macaroni and Cheese!

This Kimchi Mac and Cheese is not your standard macaroni and cheese recipe – in the best way possible. Don’t get me wrong, regular mac and cheese is delicious but this Kimchi Macaroni and Cheese is absolutely next level!
With this easy recipe, you’ll be able to build deep bold flavors in a short amount of time with a fool-proof cheese sauce that’s guaranteed lump-free! Part of that is because we’re not using flour to create a roux.
Instead, I found that cornstarch in this recipe easily thickens the sauce without risking a lumpy sauce with flour-y taste. The results are a super easy and gooey cheese sauce with deliciously bold flavors shining through.
There’s seriously no going back after this Kimchi Macaroni and Cheese!
It’s a delicious meal on its own or serve you can it up with some crunchy Korean Fried Chicken and a fresh Korean Cucumber Salad for an even more filling dinner with friends! If you love kimchi, don’t sleep on my Kimchi Bacon Fried Rice!
Ingredients for Kimchi Mac & Cheese
So, I know, this ingredient list may look hefty – BUT TRUST ME, this Kimchi Macaroni and Cheese recipe comes together incredibly easily, otherwise, I wouldn’t be making it multiple times a week haha. It’s hilarious too because Josh, my husband, does his happy dance every single time I make it!

- Pasta: Elbow pasta is a childhood favorite, however, shells are just as irresistible!
- Gochujang: Korean red chili paste packs incredible flavor and is an absolute MUST in this recipe! Note that gochujang comes in various spice levels.
- Cabbage Kimchi & Kimchi Juice: The acid from the kimchi and its juices cuts through the richness of the cheese and cream to create a beautiful balance. You can find cabbage kimchi at local Asian markets and sometimes even local Walmarts start to carry them!
- Unsalted Butter: Used in 2 parts of the recipe – First, to prevent the cooked pasta from absorbing more liquid and bloating while making the cheese sauce, and second, to caramelize the gochujang and kimchi for a deeper flavored sauce.
- Whole Milk & Heavy Cream: Heavy cream adds richness and the whole milk adds to the creaminess without making the sauce too rich once the cheese is added.
- Cornstarch: Most mac and cheese recipes use flour to create a roux, however, I found that cornstarch in this Kimchi Mac and Cheese recipe really allows the other flavors to shine without risking a lumpy sauce or flour-y taste.
- Mozzarella: It’s notorious for that epic stringiness and this Kimchi Mac and Cheese recipe maximizes it with one simple trick (more on that coming up)! Note that as epic as mozzarella is, it doesn’t have much flavor, so definitely don’t skimp on adding other cheeses for robust flavors!
- Gruyere: Gruyere has the best flavor and easily melts into the sauce for a velvety smooth sauce.
- Parmesan Cheese: Parmesan adds a subtle nutty flavor that blends beautifully with the other cheeses.
- Panko Bread Crumbs: This Japanese type of breadcrumb has a lighter texture than typical bread crumbs while creating an even crunchier texture for much longer.
- Sesame Seeds: Toasting the sesame seeds and adding them as a topping is an absolute game-changer! It adds a subtle nuttiness that elevates the whole dish.

Kitchen Tools for This Recipe
- Cast Iron: I LOVE my 9-inch cast iron for this recipe because I have less dishes by the end of it and it’s inexpensive for something that’ll literally last you forever – who doesn’t love that?? I make the cheese sauce, bake the Kimchi Macaroni and Cheese, and take it straight from the oven to the dinner table. Less dishes for the win!
- Cheese Grater: Freshly grated cheese is an absolute MUST for that drool-worthy gooey stringy Kimchi Mac and Cheese!
- Colander/Strainer: Easily and thoroughly drain your noodles with this colander that has a sturdy base.
How to Make Kimchi Macaroni and Cheese
Toast the Topping
In a dry pan, toast the panko bread crumbs and sesame seeds until golden. Don’t be tempted to skip this step! This helps bring out a deeper flavor in the sesame seeds and a crunchier texture for the panko.
They don’t turn as golden in the oven and the sesame flavor is much more muted if this step is skipped.

Cook the Pasta
Boil your pasta in heavily salted water until it’s al dente. They’ll finish cooking in the oven and absorb the delicious kimchi cheese sauce! Drain the noodles then add butter to fully coat the noodles.
The butter helps prevent the noodles from absorbing more water and bloating.
Make the Kimchi Cheese Sauce
I like my mac and cheese super cheesy and saucy, so that’s exactly what we’re going to make! In a bowl, combine the whole milk, cream, and cornstarch until smooth, then set aside.
Heat a medium pot on medium heat then melt the remaining butter. Season with onion and garlic powder, then add the gochujang to caramelize.

Add the kimchi and saute for a few more seconds until well coated. Pour in the kimchi brine and slowly add the milk cornstarch mixture. Stir and cook until the sauce starts to thicken.
Turn off the heat and slowly add the cheese a handful at a time, remembering to reserve half of the mozzarella for baking. Allow the cheese to fully melt before adding more to the sauce.
Layer & Bake
Combine the pasta and kimchi cheese sauce until well coated. Pour half of the Kimchi Macaroni and Cheese into a 9-inch cast iron or baking dish, then sprinkle on the remaining mozzarella cheese.
Add the remaining Kimchi Mac and Cheese, then finish with the crunchy panko sesame topping.

Bake at 350°F for 15 – 20 minutes, or until the sauce is golden and bubbly. Let it rest for 10 minutes after baking to allow the cheese sauce to firm up, then get ready to dig in!
Key Tips
- Freshly Grated Cheese ALWAYS: Yes, it takes slightly longer, but oh man is it worth it! Pre-graded cheese is coated in a powder that prevents it from sticking together in packaging but also prevents it from melting together to create that extra stringy gooeyness you know and love. For easy grating, pop the blocks of cheese in the freezer for about 5-10 minutes – cold cheese is easier to grate than warm cheese.
- Avoid Boiling the Dairy: Once the whole milk and cream are added to the kimchi cheese sauce, try to avoid bringing it to a boil, otherwise, you risk getting having a grainy texture in your sauce.
- Don’t Break Your Sauce: Once you have the heat turned off the sauce and you’re ready to add the cheese, work quickly enough so the sauce stays hot enough to melt the cheese, but avoid overmixing so the sauce doesn’t “break”. You’ll know your sauce is breaking if you start to see oil puddles along the edges of the pot and the sauce starts to separate.
- Save Time: Save time by cooking the pasta at the same time as you grate the cheese. Easy multi-tasking for the win!
Storage & Reheating
Store any leftover Kimchi Mac and Cheese in an airtight container in the fridge for about 5 days. Reheat in the microwave until warm.
/
Recipe FAQs
More Easy Recipes You’ll Love!


Let’s get cooking!
Get into my secret stash of Goody-Packed Newsletters with meals planned for you & time-saving tips! Want step-by-step videos of how to make my recipes too? I gotchu over at my youtube channel. Aight, enough chatting, more eating!

Kimchi Mac and Cheese
Watch How to Make It!

Ingredients
Ingredients
- 1 teaspoon kosher salt plus more for boiling
- 8 oz dried macaroni pasta
- 6 tablespoons unsalted butter divided (see directions)
- 1 1/3 cup whole milk
- 1 1/3 cup heavy cream
- 1 tablespoon cornstarch
- 1/4 teaspoon garlic powder
- 1/8 teaspoon onion powder
- 3 tablespoons gochujang
- 1/2 cup cabbage kimchi drained & finely chopped
- 7 tablespoons kimchi juice
- 4 ounces gruyere cheese shredded
- 8 ounces mozzarella cheese shredded and divided in half
- 4 ounces parmesan cheese grated
- fresh cracked black pepper to taste
Topping
- 1/3 cup panko bread crumbs
- 2 tablespoons sesame seeds
- 1 green onion thinly sliced, optional
Instructions
- Preheat the oven to 350°F (180°C).
- Bring a pot of well-salted water to a boil then cook pasta until al dente (it’ll finish cooking while baking). Drain then stir in 1 tablespoon of butter to pasta. Set aside.
- Heat a small pan on medium, then dry toast the panko bread crumbs with the sesame seeds until lightly golden. This should less than a minute, it’ll continue to turn golden in the oven. Set aside.
- In a bowl, combine the whole milk, cream, and cornstarch until smooth. Set aside.
- Heat a cast iron on medium-low heat or a large pan on medium heat, then melt the remaining butter. Add in the garlic powder, onion powder, and gochujang. Cook until the gochujang begins to caramelize, then add the chopped kimchi. Cook for another minute or so, or until the kimchi becomes tender and well coated in the gochujang.
- Stir in kimchi juice, then the cornstarch mixture, and cook until slightly thickened. You should be able to draw a line on the back of a spoon. Don't bring to a boil after the milk is added so. otherwise, you risk making a graining sauce.
- Turn off the heat, then slowly add the cheeses a handful at a time, and remember to save half of the mozzarella for baking. Work quickly so it's hot enough to melt the cheese, but try not to over-stir, otherwise, the sauce could separate. Once the cheese is melted, season the sauce with salt and pepper.
- Combine the pasta with the cheese sauce until well coated. Transfer half of the pasta to a 9-inch cast iron or baking dish, sprinkle on the remaining mozzarella, then layer on the remaining pasta. Top with the toasted panko breadcrumbs and bake for about 20 minutes, or until golden and bubbly. Allow to cool for about 10 minutes to allow the sauce to set then enjoy!
Notes
- Gochujang: Find it easily at Asian markets or some local grocery stores. Note it comes in various spice levels.
- Freshly Grated Cheese ALWAYS: TRUST ME, it’s worth the effort for gooeyness. For easy grating, you can pop the cheese in the freezer.
- Avoid Boiling the Dairy: Once the whole milk and cream are added to the kimchi cheese sauce, try to avoid bringing it to a boil, otherwise, you risk getting having a grainy texture in your sauce.
- Don’t Break Your Sauce: Once heat is off, work quickly so the sauce stays hot enough to melt the cheese, but avoid overmixing so the sauce doesn’t separate (creating oil puddles along the edges of the pot).
- Cast Iron: Use a 9-inch cast iron for fewer dishes and long-lasting durability. One-pot from sauce to table.
Nutrition
Exact calculations may vary. For the most accurate nutritional information, use your preferred nutrition calculator, actual ingredients, and quantities used for the recipe. Please consult with your physician or registered dietitian if more precise nutrition calculations are needed for health reasons.


