• Skip to primary navigation
  • Skip to main content
  • Skip to primary sidebar
Mikha Eats
  • Recipe Index
  • Fall
  • Subscribe
  • Contact
  • About
  • YouTube
  • Pinterest
  • Instagram
  • TikTok
menu icon
go to homepage
  • All Recipes
  • Fall
  • About
  • Resources
  • Subscribe
    • Instagram
    • Pinterest
    • TikTok
    • YouTube
  • subscribe
    search icon
    Homepage link
    • All Recipes
    • Fall
    • About
    • Resources
    • Subscribe
    • Instagram
    • Pinterest
    • TikTok
    • YouTube
  • ×
    • Wooden chopsticks adding salmon sushi bake to seaweed chip with avocado.
      Salmon Sushi Bake
    • White plate with tuna sushi bake on seaweed chips with cucumber slices.
      Tuna Sushi Bake
    • A silver spoon scooping pork from a pot of sinigang na baboy on a white table with vegetables.
      Sinigang na Baboy (Filipino Pork Sinigang Recipe)
    • White plate of yaki onigiri with chopsticks on a white table.
      Easy Yaki Onigiri (Japanese Grilled Rice Balls)
    • White rectangle plate with three tuna onigiri with black sesame seeds on a white table.
      Easy Spicy Tuna Onigiri (Japanese Tuna Rice Balls)
    • Photo collage of entrees and vegetable dishes to serve with fried rice.
      What to Serve with Fried Rice - 32 Top Cheap & Easy Ideas!
    • Adobo fried rice omelette on a white plate with silver spoon & fork on woven placemat.
      Adobo Fried Rice Omelette
    • Filipino eggplant omelet on a banana leaf plate with rice, mango, and banana ketchup.
      Tortang Talong (Filipino Eggplant Omelette)
    • White plate of adobo fried rice with a silver spoon and woven placemat.
      Adobo Fried Rice
    • White bowl of rice with char siu chicken slices and bok choy on a white table.
      Char Siu Chicken
    • White bowl of rice with char siu pork slices and bok choy on a white table.
      Char Siu Pork
    • Chicken Adobo in a black pan topped with green onions and black peppercorns.
      Adobong Manok | Easy Chicken Adobo Recipe
    Home » Recipes » 30-Minutes or Less

    Easy Salmon Onigiri (Japanese Salmon Rice Balls)

    Published: Oct 24, 2023 by Mikha S. · This post may contain affiliate links

    Sharing is caring!

    1 shares
    • Facebook
    • Twitter
    • Email
    • WhatsApp
    Jump to Recipe Print Recipe

    Kick soggy sandwiches & boring lunches goodbyyyye! Enjoy these easy Salmon Onigiri on-the-go while transporting your tastebuds to pure happiness - in just 15 minutes!

    Simple ingredients come together so easily for this beginner-friendly Salmon Onigiri recipe! Give that lonely leftover salmon new delicious purpose and create a filling snack you can enjoy on the go - no utensils required!

    These delicious rice balls are popular at Japanese convenience stores & one of the things I love about them is that it's SO versatile too. Not feeling salmon? No worries - swap it for Tuna onigiri or even grill it up for even more depth of flavor as Yaki Onigiri!

    Save This Recipe - Optin Form

    WANT TO SAVE THIS RECIPE?

    Enter your email below & save it straight to your inbox. Plus you’ll get key tips & recipes to make cooking easier every week!

    If you're feeding a crowd, whip up an easy Sushi Bake for bite-size sushi handrolls in 30 minutes or less - no fancy rolling required. Craving more veggies? Create Sesame Tuna Onigirazu or Spicy Vegetable Onigirazu loaded with crisp vegetables for another version of a full meal in the palm of your hand!

    Jump to:
    • ❤️ Recipe Highlights 
    • 🥘Salmon Onigiri Ingredients
    • 📖 Variations & Substitutions
    • 🔪 How to Make Salmon Onigiri
    • 👩🏽‍🍳 Key Tips
    • 💭 Recipe FAQs
    • 🥗 More Easy Recipes You’ll Love
    • Easy Salmon Onigiri (Japanese Salmon Rice Balls)
    • ⭐ Comments

    ❤️ Recipe Highlights 

    • Repurpose Leftover Salmon: This Japanese rice ball recipe is your sign to use up leftover salmon hanging in the back of the fridge for a quick & budget-friendly meal!
    • Eat On-the-Go: Pack these babies up for a weekend picnic, road trip snack, or even workday lunch - no utensils needed 🙂
    • SUPER Easy Meal & Molding: This Salmon Onigiri recipe is SO versatile, you can easily swap out the filling (ideas below!) & comes together in minutes with the easiest molding.

    🥘Salmon Onigiri Ingredients

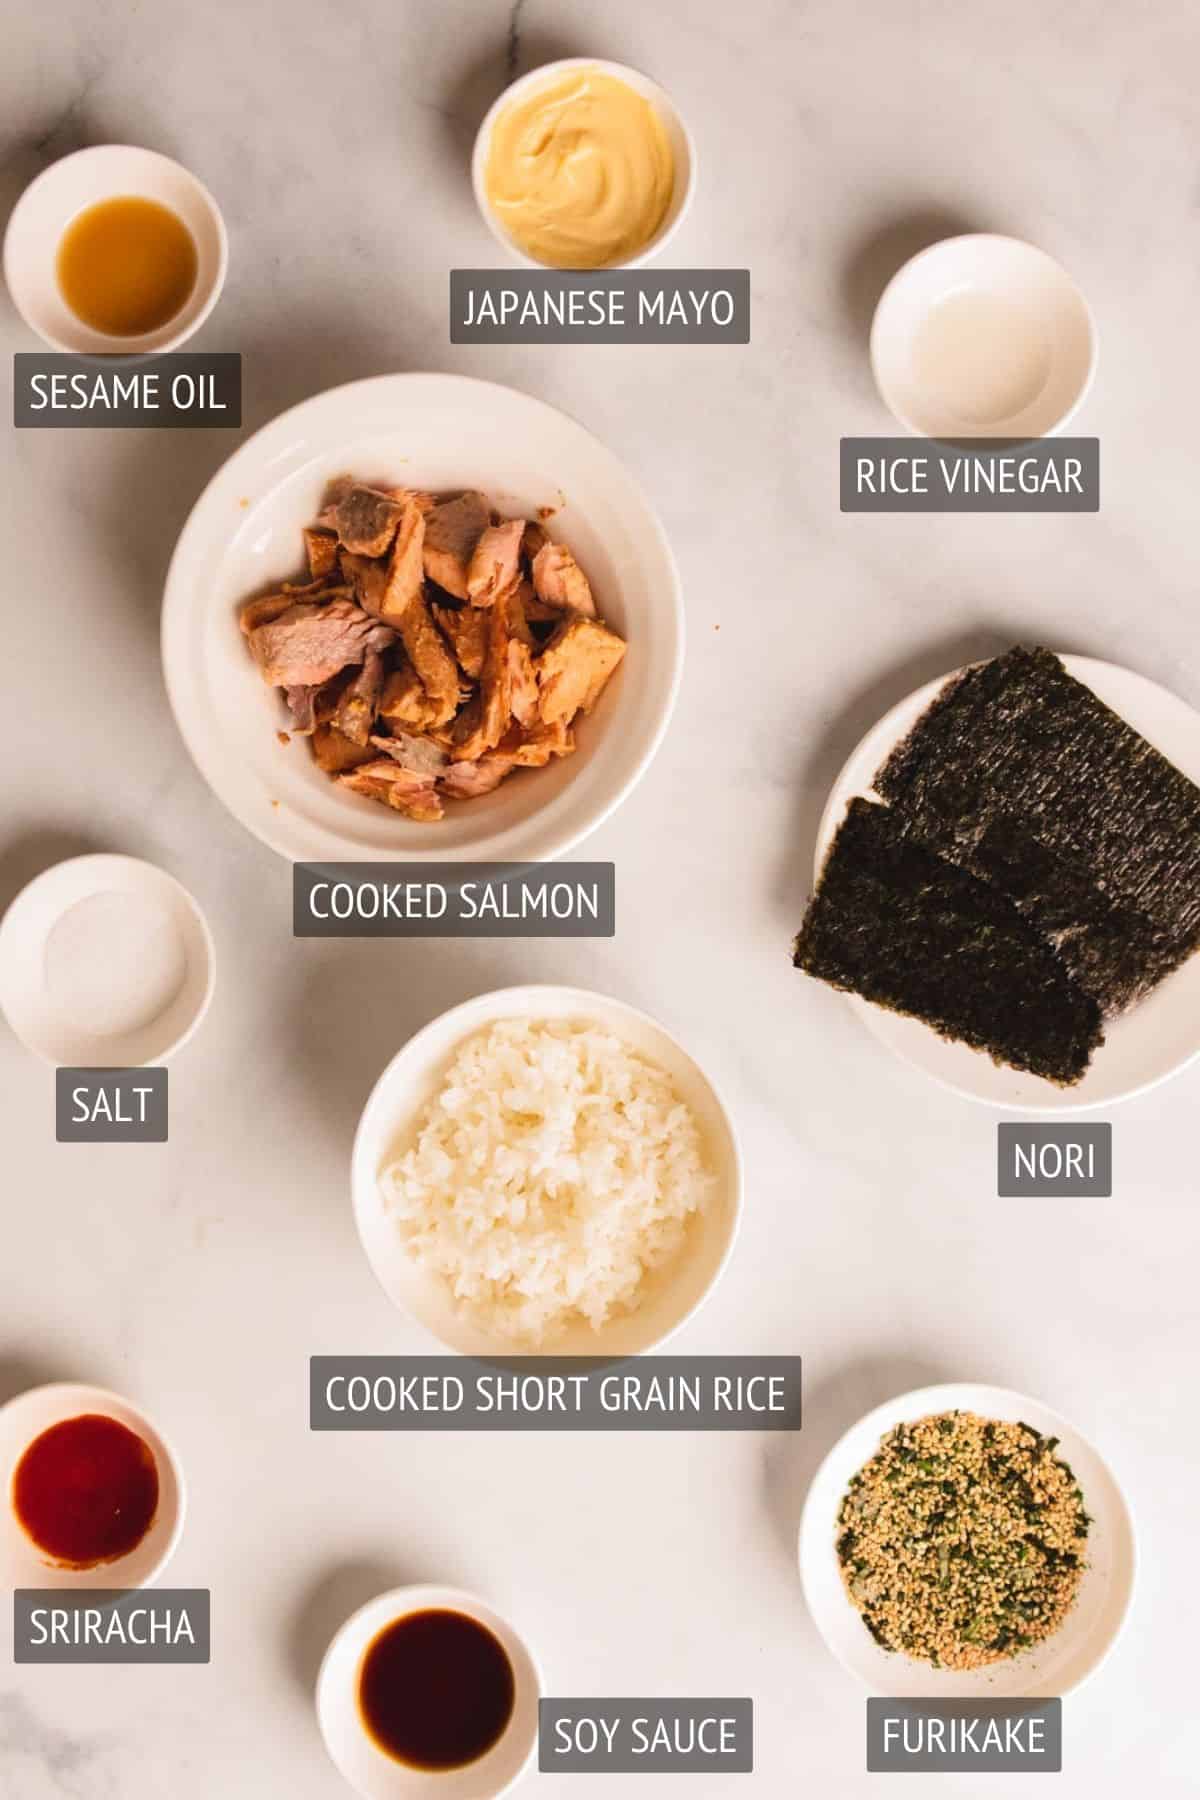
    • Cooked Rice: For this Salmon Onigiri recipe, we're going with sushi rice – a short grain rice that has a nice chew & much stickier than long grain rice. If you use long-grain rice (such as jasmine rice) or brown rice, you'll find your onigiri easily falling apart because it doesn't have that same stick consistency. You can grab short-grain rice at your local Asian and Japanese market or online labeled as sushi rice or sweet rice, super easy!
    • Salmon: Any cooked salmon is a great way to create a quick meal. So, seared salmon fillet, canned & drained salmon, leftover salmon, or even salmon flakes would all be delicious!
    • Japanese Mayo: Alright, let's talk mayo! Once you try Japanese mayo, there's no going back! It's creamy with a subtle tang that makes it next level compared to the regular American mayo in my humble opinion. I HIGHLY recommend using it for this recipe. You can find it at Asian and Japanese markets or even at some local grocery stores in the Asian/International section. It's SO good, slowly becoming a pantry staple!
    • Soy Sauce: Now, for extra umami, I like to season the filling with regular soy sauce (not low sodium). It brings in that salty and umami goodness.
    • Sesame Oil: This is a pantry staple that adds a deep nutty flavor. A touch goes a long way & an absolute must!
    • Rice Vinegar: Just a touch of rice vinegar goes a long way to balance out the creaminess and saltiness of our other ingredients.
    • Sriracha: Spicy lovers, this one is for you! Add a bit (or a lot if your spicy heart desires). This is totally optional! This spicy Salmon Onigiri is all about making them your own, so spice it up to match your taste buds!
    • Salt: A sprinkle of salt is used on the rice in Japanese cuisine not only to season it, but it also helps preserve the onigiri. But remember, a little goes a long way, so don't go overboard. You don't want your onigiri to be salty!
    • Nori: Nori seaweed adds extra flavor and prevents your fingers from getting too sticky from the rice when eating. Some nori sheets come perforated for even easier prep!
    • Furikake: Last but not least, let's talk about furikake. There are a ton loads of varieties, but they all start with seaweed and sesame seeds. Feel free to get creative and use your favorite furikake.

    See recipe card for quantities.

    📖 Variations & Substitutions

    Onigiri is all about making it your own! If you're a spicy lover, add more even more sriracha - adjust to your tastebuds.

    Not in the mood for salmon? Swap it out or mix & match your fillings. Here are a few ideas:

    • Tuna onigiri
    • Yaki ongiri (grilled ongiri)
    • Mentaiko (spicy cod roe)
    • Furikake (sprinkled all over onigiri)
    • Umeboshi (Japanese pickled plum)
    • Okaka (shaved bonito flakes)
    • Kambu (seaweed)
    • Salted salmon

    🔪 How to Make Salmon Onigiri

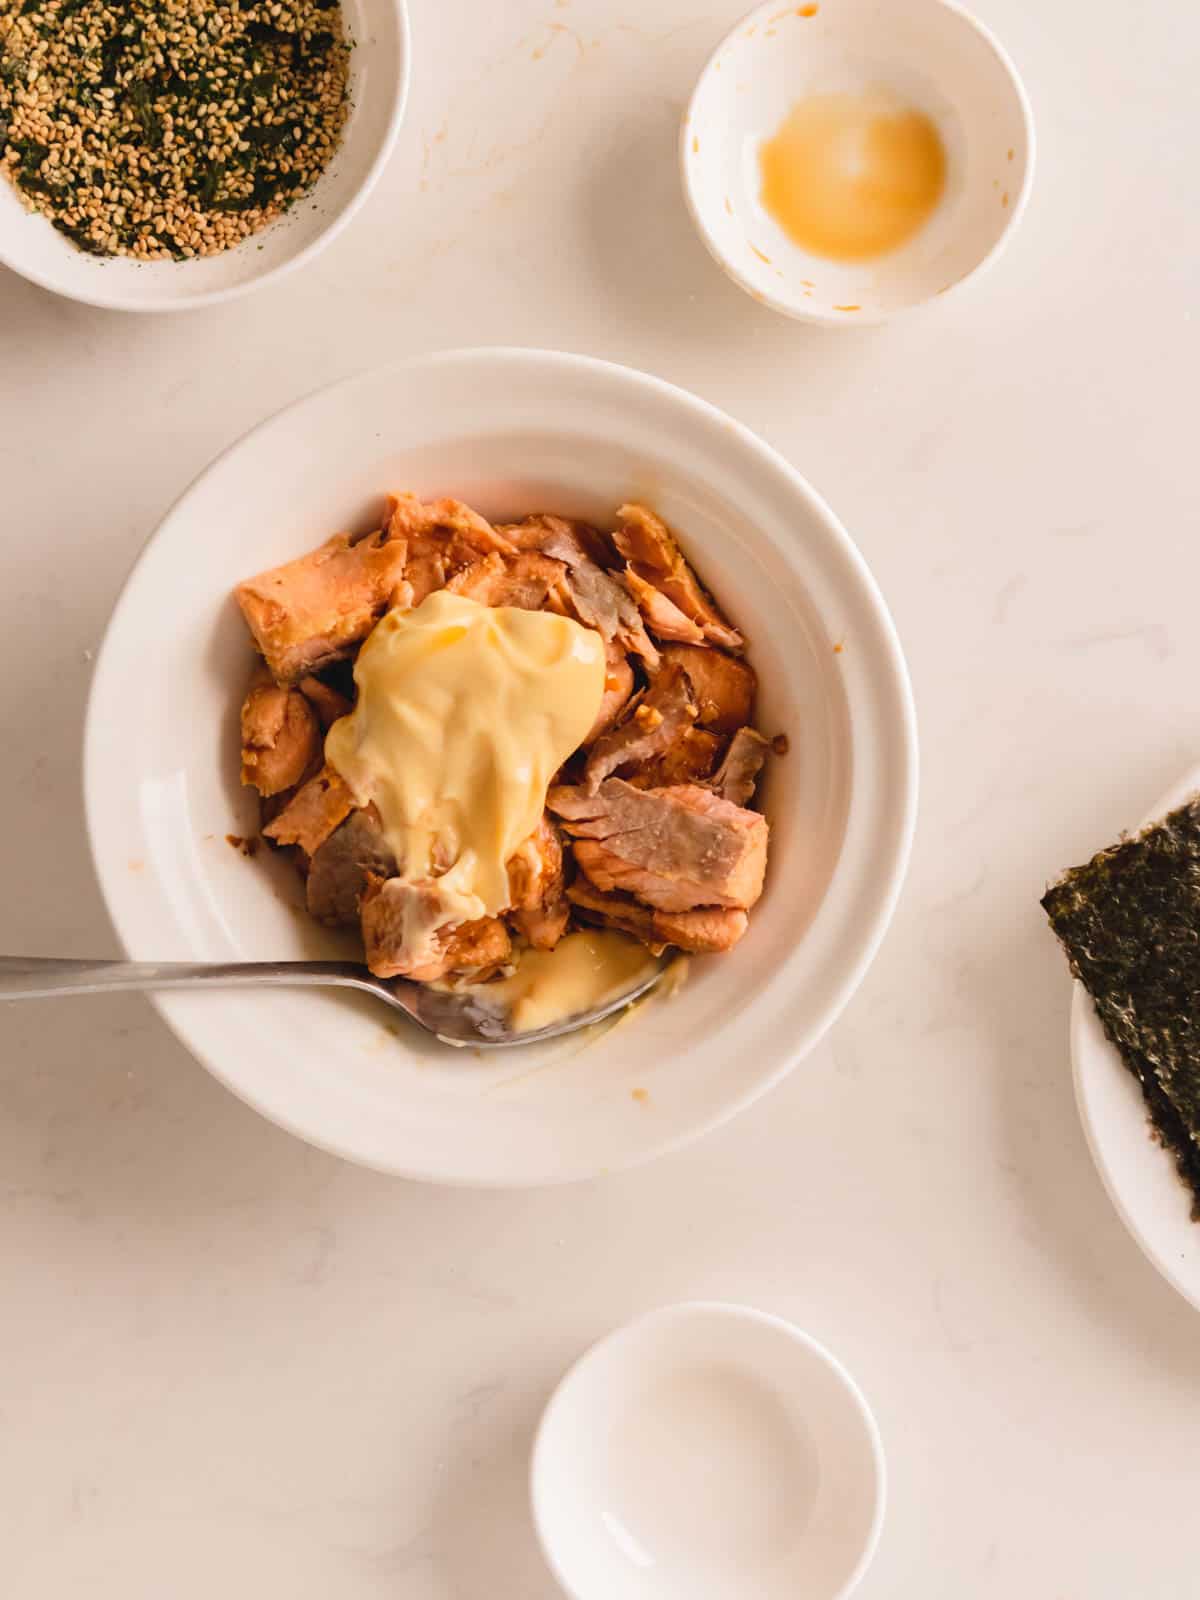
    Step 1: In a medium-sized bowl, make the onigiri filling by combining flaked salmon, Japanese mayo, soy sauce, sesame oil, rice vinegar, & sriracha (if using). Set aside.

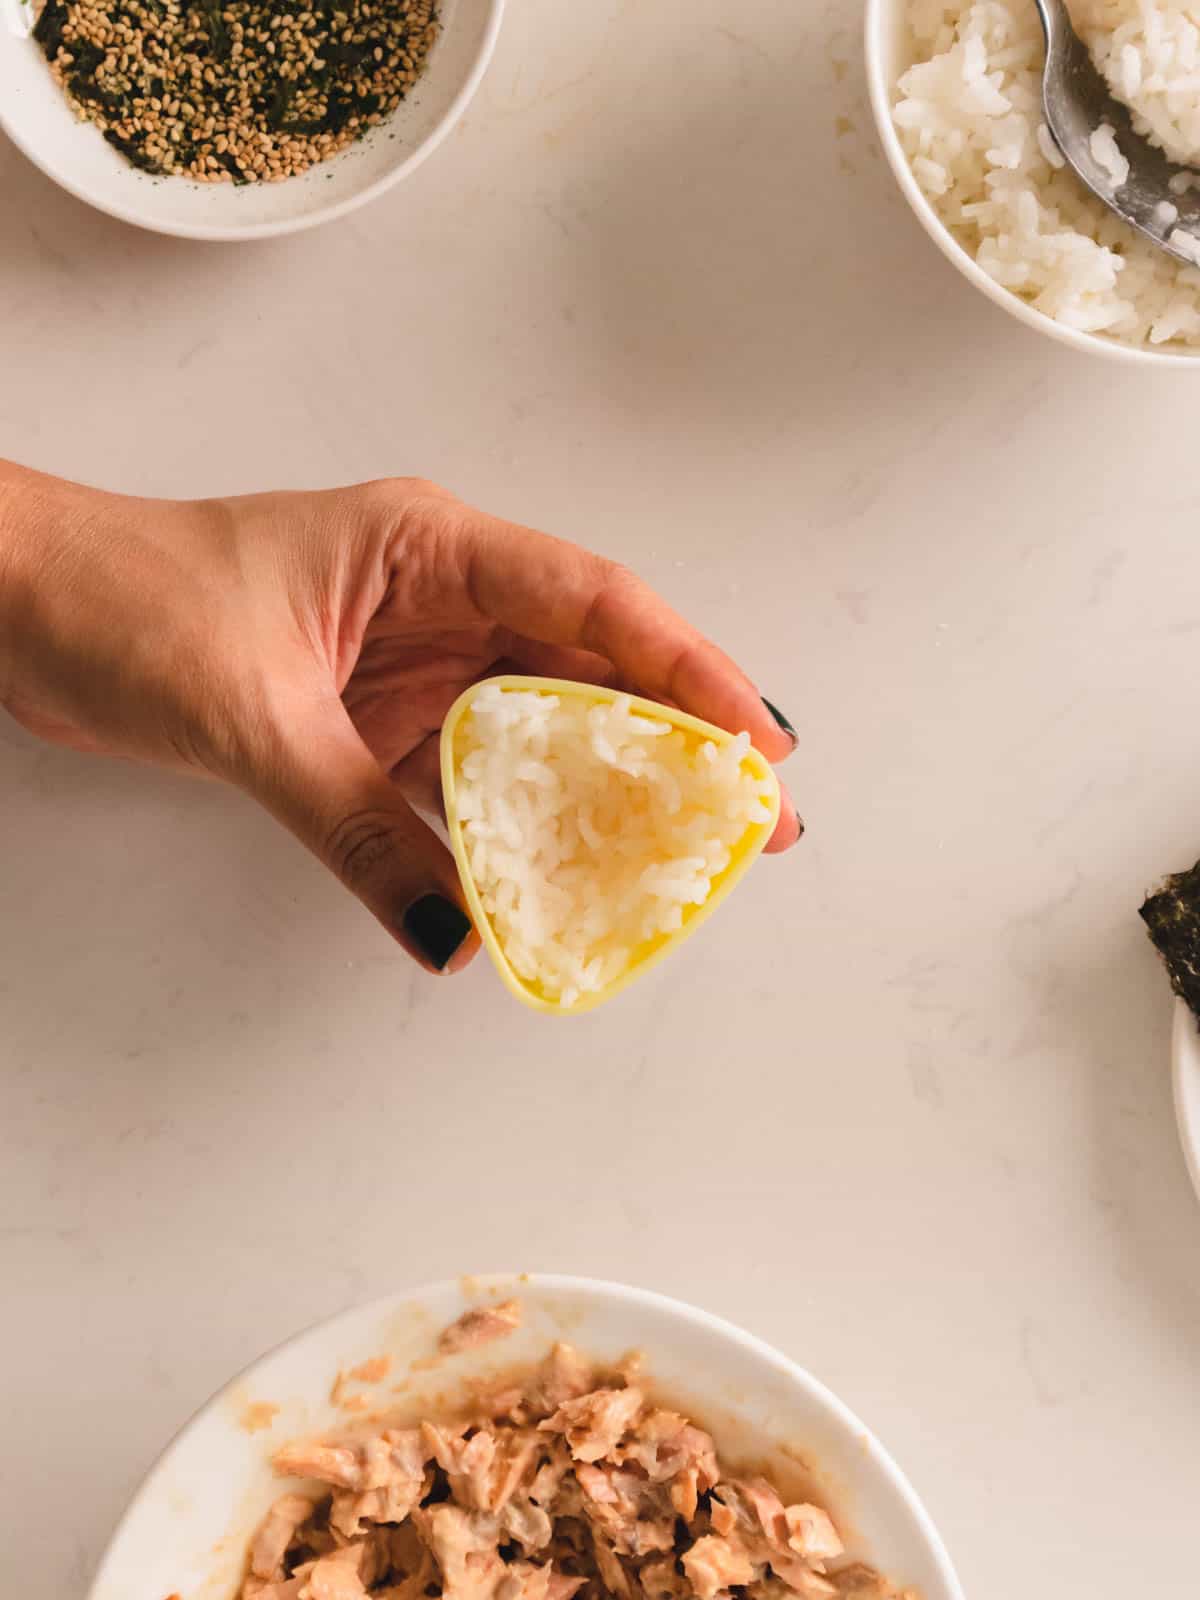
    Step 2: Dip your onigiri mold in cold water (this makes it easier to remove the salmon rice ball later). Sprinkle a tiny bit of salt at the bottom of the mold, then add a layer of rice with a little divot in the center. Dip your fingers/spoon with some cold water to prevent sticking & make the warm rice easier to work with.

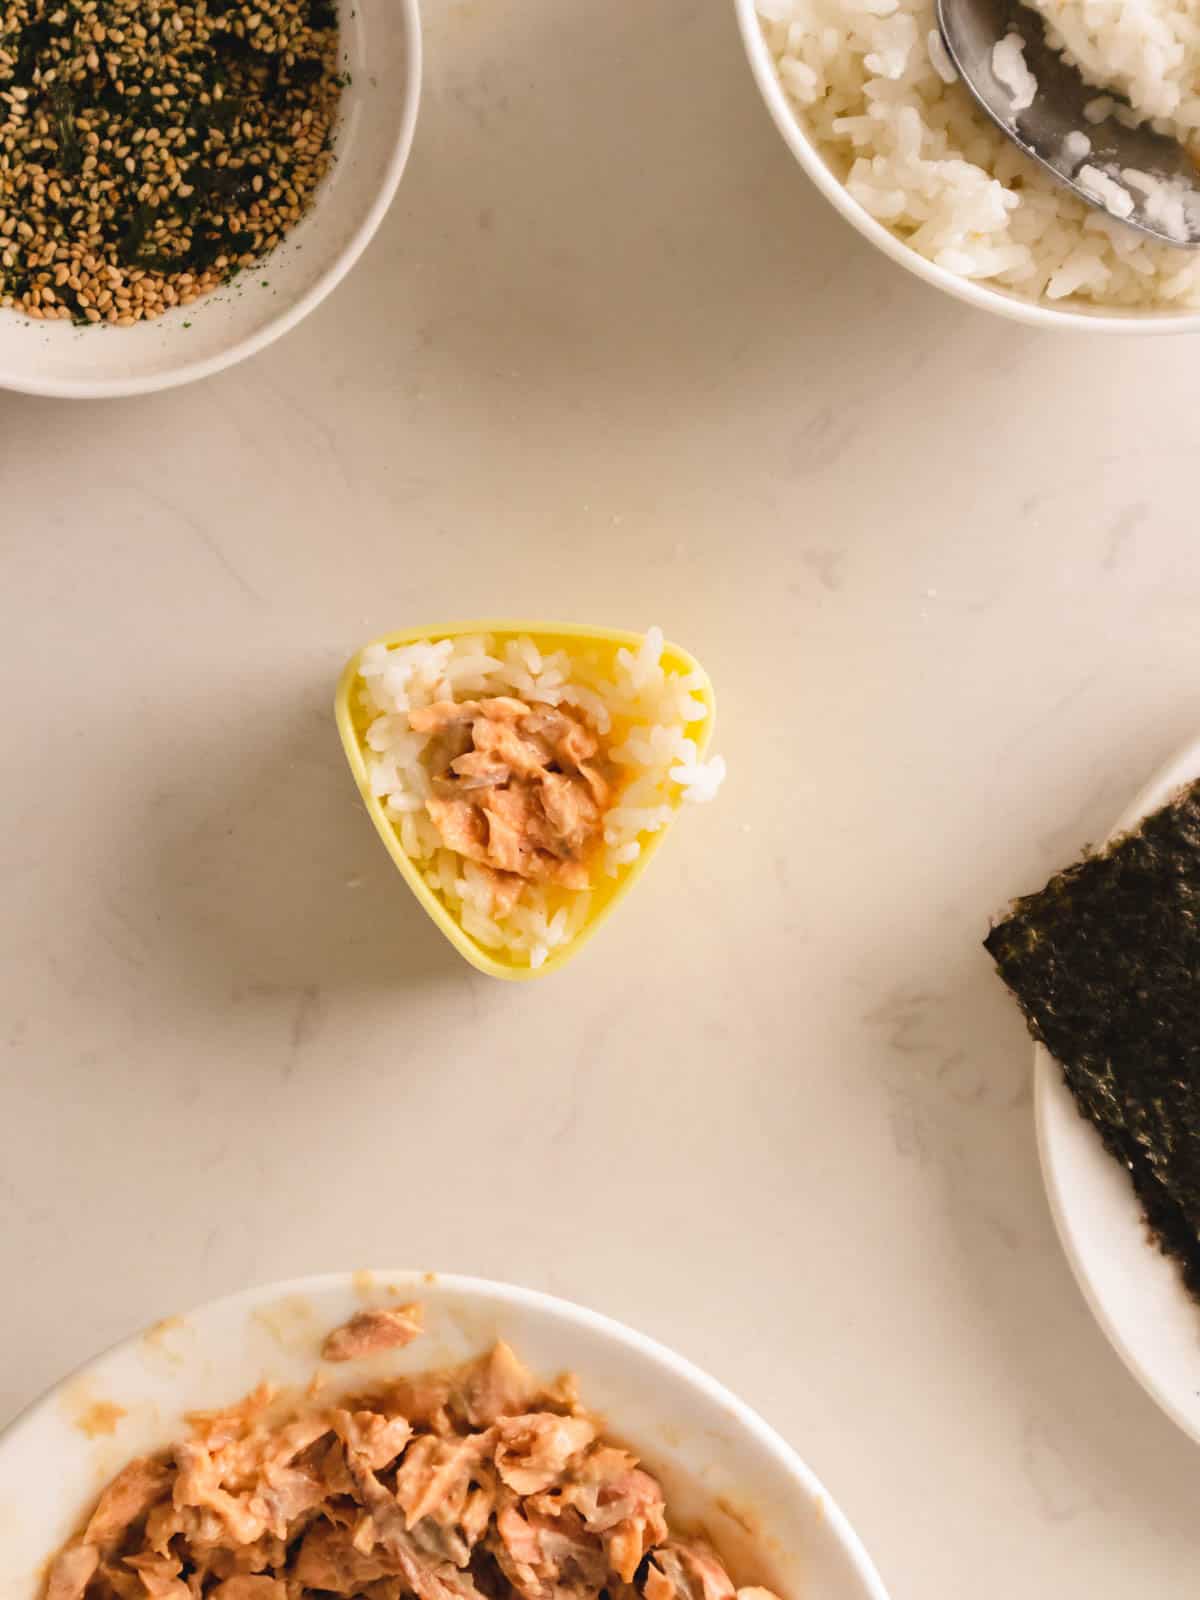
    Step 3: Add about a tablespoon of the salmon filling to the middle of the mold, cover the filling with more rice, then sprinkle a tiny bit more salt on top.
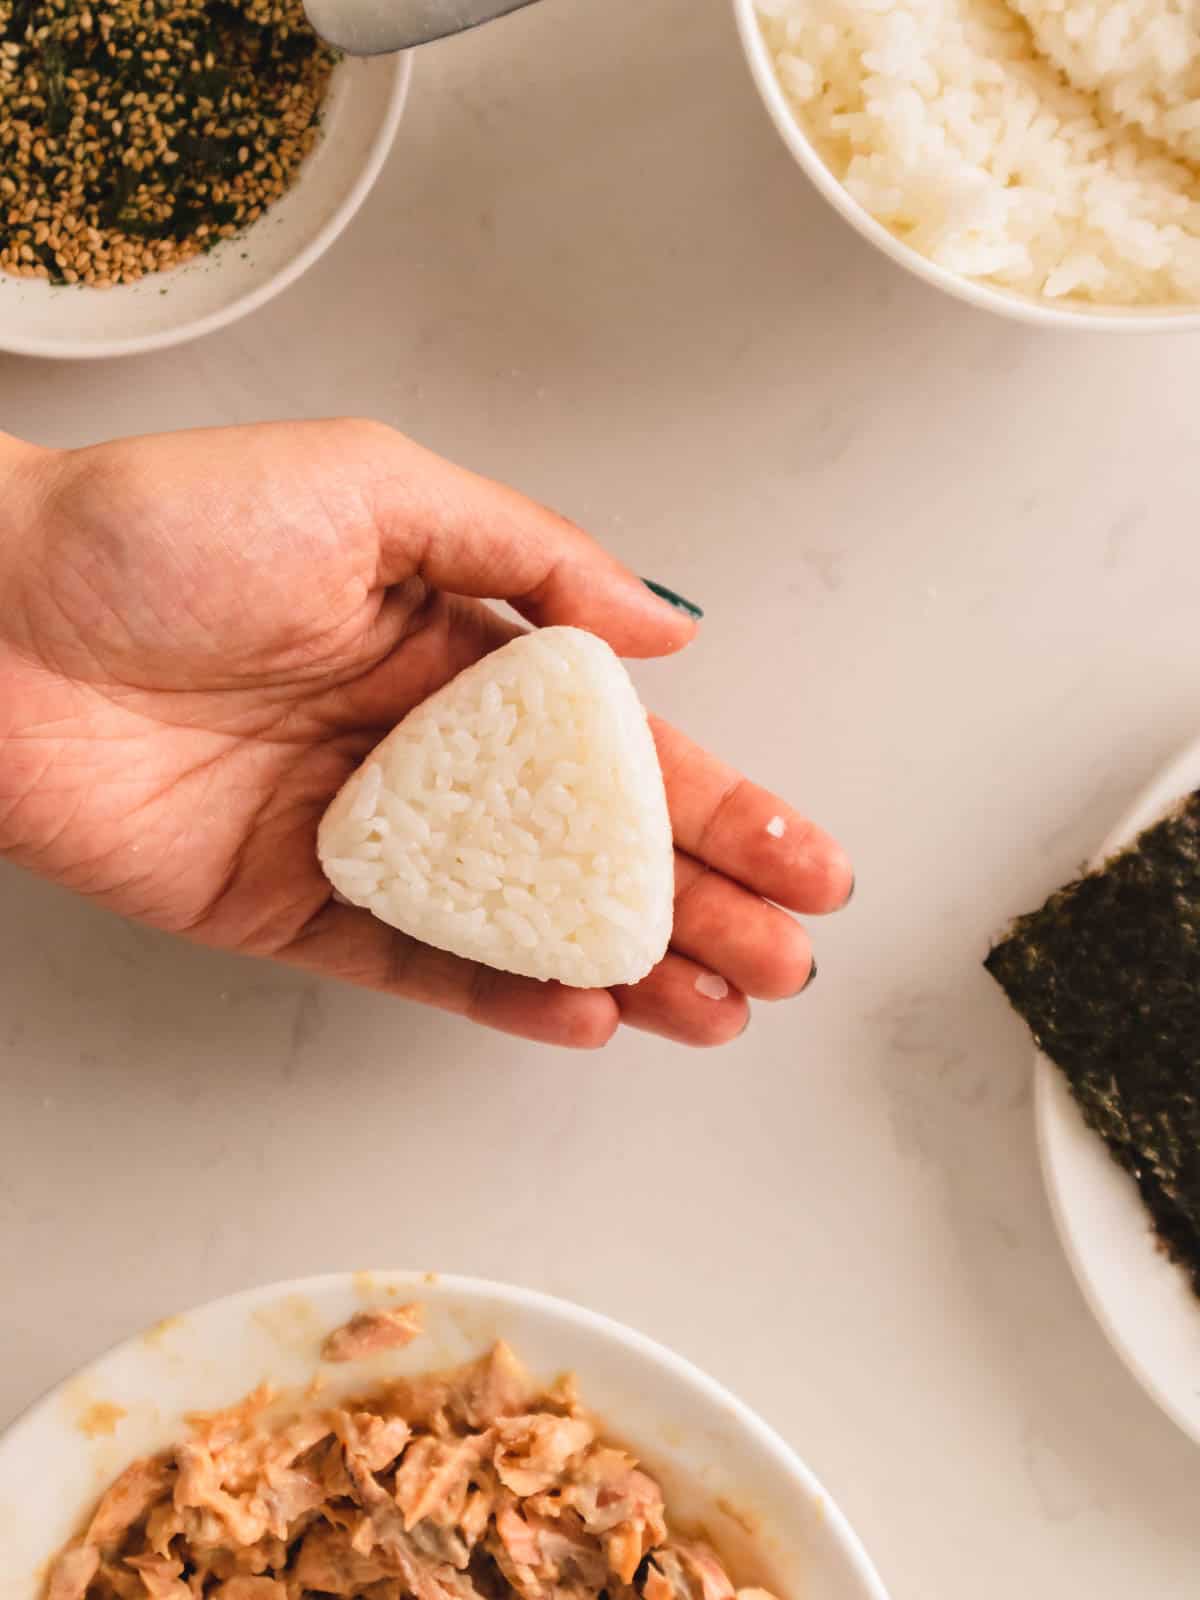
    Step 4: Place the mold's lid on top & give it a gentle but firm press. You'll want to feel just a bit of resistance. If not, add a little more white rice to make sure your onigiri is snug. Gently press the back of the mold to release your onigiri!

    Step 5 (optional): Roll the sides of the salmon rice balls in furikake. This is optional for presentation & extra flavor!

    Three salmon onigiri on a white oval plate with ingredients around on a white table.

    Step 6: Wrap in nori strips, then repeat the process for remaining rice & onigiri filling. Enjoy your delicious salmon onigiri immediately!

    👩🏽‍🍳 Key Tips

    • Easy Onigiri Making with a Mold: Using a mold is a game-changer when it comes to making onigiri! It saves so much time & comes out perfect every time! Just be sure to really pack that rice and filling into the mold – it's like giving your onigiri a cozy home that keeps it from falling apart as you enjoy it.
    • No mold? No Worries! Wet your hands with water & add a pinch of salt. Spread a thin layer of rice into your palm, add a bit of salmon filling in the center, then wrap the rice around it into a compact triangle shape. Wrap it in some nori & enjoy! It might not be perfect at first but it gets easier with a little practice.
    • Rinse that Rice: Before cooking your sushi rice, rinse it thoroughly until the water runs clear. This key step remove excess starch that could turn your rice into a mushy gluey mess.
    • Use Warm Rice: Fresh, hot rice is the secret to super-sticky onigiri that easily holds its shape. Cold rice just doesn't stick as well.
    • Keep Rice Off Your Hands: Rice, especially the short-grain kind, can be a super sticky. To make your life easier, dip your hands or spoons in water before getting touchy with the rice. It'll help keep that stickiness in check.
    • The Salt Story: Sprinkle a dash of salt at the bottom of your mold and again on top of the rice. It's not just for flavor – it also helps preserve your onigiri.
    Salmon onigiri rolled in furikake on a white oval plate with chopsticks on a white table.

    💭 Recipe FAQs

    How do you store salmon onigiri?

    Onigiri is best enjoyed immediately, but sometimes there are leftovers. No worries! Just individually wrap the onigiri with some plastic wrap & leave them at room temperature for up to 5 hours. If possible, store the salmon onigiri without the nori, otherwise, it'll be soggy later.

    The salt sprinkled on the rice helps preserve the onigiri fresh for a few hours, then you'll need to store it in the fridge.

    How do you reheat onigiri?

    Pop the salmon onigiri in the microwave with a damp paper towel on top to keep that rice from drying out. Reheat until the rice is back to being warm and tender. Wrap it in nori & enjoy!

    How do you eat onigiri?

    Onigiri is eaten with your hands like a sandwich - no utensils needed! Just pick it up & enjoy.

    If you're packing it to enjoy later, store the nori (seaweed) separately so it doesn't get soggy. Wrap your onigiri right before eating.

    Can you eat salmon onigiri cold?

    Onigiri is pretty versatile. It's typically enjoyed warm or room temperature, but of course, you can enjoy it chilled if that's your preference!

    What is the difference between sushi and onigiri?

    Sushi & onigiri may have similar ingredients, but they're completely different dishes.

    Sushi can include raw or cooked seafood & the rice is seasoned with rice vinegar, sugar, & salt. Onigiri is molded into its iconic triangle shape, doesn't use raw seafood, & the rice is seasoned with salt. Sushi can be pricier, while onigiri is more more of a budget-friendly everyday meal - both are absolutely delicious

    Is onigiri healthy?

    Onigiri is a quick, healthy, & filling meal that's super easy to enjoy on the go! You can enjoy them stuffed with a variety of fillings, grilled, or plain. Any way you have them, they're absolutely delicious!

    🥗 More Easy Recipes You’ll Love

    • Holding two halves of Japanese egg salad sandwiches with chives sprinkled on top.
      Japanese Egg Salad Sandwich (Tamago Sando)
    • Wooden noodles twirling yaki udon from serving plate.
      Vegetarian Udon Noodle Stir Fry (Yaki Udon)
    • Holding plate of mentaiko pasta with chopsticks.
      Mentaiko Pasta Sauce
    • Silver spoon drizzling teriyaki sauce on rice plate of chicken and broccoli.
      Easy Teriyaki Chicken Recipe

    Let's Get Cooking!

    Subscribe to my Goody-Packed Newsletters stuffed with time-saving tips, game-changing cooking tools, & first access to new recipes that makes life easier & more delicious! Get them straight to your inbox so you never go hangry 😉

    For drool-worthy step-by-step videos, follow along @MikhaEats on Instagram & Tiktok - and don't forget to tag @MikhaEats for a chance to be featured!

    Salmon onigiri rolled in furikake on a white & brown rimmed plate.

    Easy Salmon Onigiri (Japanese Salmon Rice Balls)

    Author: Mikha S.
    Course: Appetizer, Snack
    Cuisine: Japanese
    Kick soggy sandwiches & boring lunches goodbyyyye! Enjoy these easy Salmon Onigiri on-the-go while transporting your tastebuds to pure happiness - in just 15 minutes!
    5 from 1 vote
    Print Recipe Pin Recipe Save Recipe Saved!
    Prep Time: 15 minutes mins
    Total Time: 15 minutes mins
    Servings: 4 small onigiri
    Calories: 311 kcal

    Ingredients
      

    • 4 oz canned or cooked salmon drained/pat dry and flaked
    • 1 ½ tablespoons Japanese mayo
    • 1 ½ teaspoon soy sauce
    • ½ teaspoon sesame oil
    • ⅛ teaspoon rice vinegar
    • ¾ teaspoon sriracha optional
    • 1 ½ cup freshly cooked short grained rice*
    • Salt
    • 3 nori sheets cut into 4-inch x 1 ½-inch strips
    • Furikake optional for garnish

    Instructions
     

    • In a medium-sized bowl, combine salmon, Japanese mayo, soy sauce, rice vinegar, & sriracha (if using). Set aside.
    • In the onigiri mold, sprinkle a very small amount of salt, add enough rice to cover the bottom of the mold. Then, add about 1 ½ tablespoon of salmon filling in the center, then more rice on top to cover the filling. Note that the amount of rice and filling depends on the size of the mold. For best results, make sure your rice & filling are really packed in.
    • Put the top of the mold on top, then gently & firmly press to make rice tightly packed. You should feel a little resistance, but if you don’t, you might want to add a bit more rice so your onigiri is full & tightly pressed together. Press the back of the mold to release the onigiri.
    • Wrap onigiri with a piece of nori.
    • Roll the sides of the onigiri in furikake, if using. Repeat for remaining filling & rice. Enjoy immediately!
    Last Step: Please tap to leave a rating & comment sharing how you liked the recipe! This helps us create high-quality content for you & a food-loving community where we can all learn from each other 🙂

    Notes

    • Rice: Short grain rice can be labeled sushi or sweet rice & can be easily found at local Asian or Japanese markets. If you have trouble finding it, medium-grain rice also works, but it won't be as sticky or have the same chew.
    • Salmon: This is a great way to use up any leftover salmon hanging out in the back of the fridge. Drained canned salmon works too.
    • Furikake: This is optional for presentation & extra flavor! There are plenty of variations of furikake but the core ingredients include sesame seeds & nori. Feel free to use any of your fave variations!
    • Key Tips: For step-by-step photos & key tips on forming the onigiri rice balls, scroll to the blog post above. 

    Nutrition

    Serving: 1onigiriCalories: 311kcalCarbohydrates: 60gProtein: 5gFat: 5gSaturated Fat: 1gPolyunsaturated Fat: 3gMonounsaturated Fat: 1gTrans Fat: 0.01gCholesterol: 2mgSodium: 180mgPotassium: 71mgFiber: 2gSugar: 0.1gVitamin A: 102IUVitamin C: 1mgCalcium: 5mgIron: 3mg

    Exact calculations may vary. For the most accurate nutritional information, use your preferred nutrition calculator, actual ingredients, and quantities used for the recipe. Please consult with your physician or registered dietitian if more precise nutrition calculations are needed for health reasons.

    Mikha using chopsticks to eat a bowl of noodles.

    HEY, I'M MIKHA!

    ...A fellow food lover who believes anyone can whip up a delicious meal - no matter your skill level! These quick & easy Asian recipes will help you transform simple ingredients into a drool-worthy meal for you & the people you love most - without spending all day in the kitchen.

    Now come on - Grab a seat & let's eat!

    • YouTube
    • Instagram
    • TikTok
    • Pinterest

    More About Me →

    Fresh Hot Bites!

    • Black pan full of garlic noodles topped with grated cheese and green onions.
      Best Asian Garlic Noodles Recipe
    • White bowl and silver spoon with rice and tomato egg stir-fry topped with green onions.
      Easy Chinese Egg Tomato Stir Fry Recipe
    • Panful of Rabokki with ramen noodles, rice cakes, and hard-boiled eggs.
      Rabokki | Tteokbokki Ramen
    • Glossy udon noodles coated in soy-based sauce with steak & veggies.
      Easy Beef Yaki Udon Noodle Recipe

    ⭐ Comments

    Reader Interactions

    Leave a Reply Cancel reply

    Your email address will not be published. Required fields are marked *

    Recipe Rating


    This site uses Akismet to reduce spam. Learn how your comment data is processed.

    Primary Sidebar

    Mikha eating spicy noodles from a bowl.

    HEY FRIEND, I'M MIKHA!

    ...A fellow food lover who believes anyone can whip up a delicious meal - no matter your skill level! These quick & easy Asian recipes will help you transform simple ingredients into a drool-worthy meal for you & the people you love most - without spending all day in the kitchen.

    Now come on - Grab a seat & let's eat!

    More About Me →

    Follow for More
    Drool-Worthy Content!

    YouTube
    Pinterest
    TikTok
    Instagram

    Fall Faves

    • Chopsticks pickup up japchae.
      Korean Vegetarian (Veggie) Japchae
    • Chicken Adobo in a black pan topped with green onions and black peppercorns.
      Adobong Manok | Easy Chicken Adobo Recipe
    • Filipino eggplant omelet on a banana leaf plate with rice, mango, and banana ketchup.
      Tortang Talong (Filipino Eggplant Omelette)
    • White plate of adobo fried rice with a silver spoon and woven placemat.
      Adobo Fried Rice
    • White bowl of rice with char siu chicken slices and bok choy on a white table.
      Char Siu Chicken
    • Ginitaang Laing with rice and chili vinegar.
      Ginataang Laing Recipe

    Popular Recipes

    • Eggplant tofu stir-fry topped with sesame seeds & green onions in a white bowl.
      Stir Fry Eggplant Tofu
    • Square plate of miso mushrooms garnished with chopped chives.
      Miso Mushrooms (with Soy Sauce)
    • Chopsticks holding a piece of spicy garlic edamame.
      Spicy Edamame with Garlic
    • Holding two halves of Japanese egg salad sandwiches with chives sprinkled on top.
      Japanese Egg Salad Sandwich (Tamago Sando)
    • Baking pan of sushi bake with green onions and nori.
      Immitation Crab Sushi Bake
    • Close-up of ladle of chicken sinigang above the pot.
      Sinigang Na Manok (with Chicken)

    Footer

    ↑ back to top

    Quick Links

    Explore Recipes

    Shop Kitchen Essentials

    About Mikha

    Privacy Policy

    Accessibility Statement

    Keep in Touch!

    Get in Touch!

    Subscribe

    Pinterest

    Instagram

    Tiktok

    Mikha Eats is a participant in the Amazon Services LLC Associates Program, an affiliate advertising program designed to provide a means for sites to earn advertising fees by advertising and linking to Amazon.com.

    Copyright © 2022 MIKHA EATS